锐单电子商城 , 一站式电子元器件采购平台!
  • 电话:400-990-0325

基于Wio Terminal的简易智能家居中控系统(初代版本)

时间:2022-10-11 06:30:00 wio传感器

经过不断的坑(学习),第一代简单的智能家居中央控制系统已经完成,项目填写的功能已经完成,但有些功能没有使用Wio Terminal实现(一方面是因为代码量太大,会给Wio Terminal的"压力"另一方面,我的技术还不够,我必须继续学习和寻找解决方案)。

先给大家介绍一下我最初的想法

项目简介

??Wio Terminal is a highly integrated development board, which comes with an LCD display, three buttons, a five-way switch, as well as microphones, speakers, accelerometers, infrared transmitters, etc., it can even be combined with the Raspberry Pi, Jetson nano! As the “brain” of a home, these hardware are extremely practical, therefore, in the smart home control system, I choose Wio Terminal as the core of this system.
??Wio Terminal它是一个高度集成的开发板,它有液晶显示屏、三个按钮、五向开关麦克风扬声器、加速度传感器、红外发射器等,甚至可以与覆盆子一起使用Jetson nano结合。而作为家"大脑",这些硬件非常实用。因此,在智能家居中央控制系统中,我选择Wio Terminal作为该系统的核心。

??In the future, there should be a smart housekeeper in the house, and this smart housekeeper is a simple version of what I am doing now. With it, you will be able to get accurate and real-time data of temperature, humidity, light intensity and so on. Not only that, it’s also like a “universal” remote control which can help you control your home’s appliances. Of course, it should be like a smart speaker can understand our instructions, and give us a response!
??在未来的家里,应该有一个智能管家,这个智能管家是我现在做的一个简单的版本。有了它,你可以在家里获得准确实时的温度、湿度、光强等数据。不仅如此,它还像一个"万能"遥控器可以帮助你控制家里的电器。当然,它应该能够理解我们给它的指令,并像智能扬声器一样回应我们!

系统功能

  1. 温湿度、光强、大气压力、可燃气体含量等数据显示在液晶显示屏上。为了省电,当用户拿起它时,系统会显示这些数据。
  2. 控制灯的开关,左边的按钮可以控制灯的开关,中间和右边的按钮可以分别调亮和调暗。
  3. 在与系统交谈时,他会向用户发送包含温湿度、光强、大气压力、可燃气体含量等数据的电子邮件。
  4. 当用户控制灯或语音控制其发送电子邮件时,该系统会给出语音反馈。

前期准备

在做这个项目的过程中,我第一次使用它Wio Terminal这个开发板:
给初次使用Wio Terminal开发者入门指南

不知道为什么,我在Wio Terminal上使用Grove - Temperature Humidity Pressure Gas Sensor我不能收到数据,所以我不得不绕过它来实现它:
使用Django构建简单数据中台(基于简单数据中台)Grove - Temperature Humidity Pressure Gas Sensor)

实现显示数据的主要功能:
使用Wio Terminal通过HTTP获取并显示传感器实时数据

下一步是改进其他三个功能。我主要通过这三个功能Python实现

完善系统功能

前面我简单提一下有些不在。Wio Terminal功能实现的原因,具体原因没有解释太多,毕竟,刚刚开始做,所以我计划先实现功能,至于实现,我想改进第二代系统

通过Wio Terminal输出状态

我想表达的状态是读取Configurable Buttons状态(是否按下按钮)和Microphone的数据 (数据也可以代表状态)

对于Wio Terminal简单地输出这些数据相对简单

在setup()补充引脚定义:

pinMode(WIO_MIC, INPUT); pinMode(WIO_KEY_A, INPUT_PULLUP); pinMode(WIO_KEY_B, INPUT_PULLUP); pinMode(WIO_KEY_C, INPUT_PULLUP); 

在loop()里补充if条件语句:

int val_first = analogRead(WIO_MIC); int val_next = analogRead(WIO_MIC);  if (abs(val_first - val_next) >= 100){ 
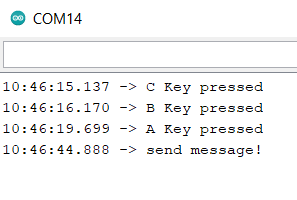
          Serial.println("send message!");   } (digitalRead(WIO_KEY_A) == LOW) { 
       
  Serial.println("A Key pressed");
 }
if (digitalRead(WIO_KEY_B) == LOW) { 
       
  Serial.println("B Key pressed");
 }
if (digitalRead(WIO_KEY_C) == LOW) { 
       
  Serial.println("C Key pressed");
 }

当Wio Terminal连接PC端时,PC端会读取串口的数据,读到对应的输出就做出相应的动作

到这里,所有关于Arduino的代码就讲完了,下面把代码整理一下,分享给大家,这篇文章没有讲到的代码,请到前期准备里查看

#include 
#include 
#include"LIS3DHTR.h"
#include"Free_Fonts.h"
#include"TFT_eSPI.h"


TFT_eSPI tft;
LIS3DHTR<TwoWire> lis;
WiFiClient client;

const char* ssid     = "Your WiFi account";
const char* password = "Your WiFi password";
const char*  server = "192.168.1.102";  // Server URL
String data;
float accelerator_readings[3];

 
void setup() { 
       
  
    //Initialize serial and wait for port to open:
    Serial.begin(115200);
    delay(100);

    pinMode(WIO_MIC, INPUT);
    pinMode(WIO_KEY_A, INPUT_PULLUP);
    pinMode(WIO_KEY_B, INPUT_PULLUP);
    pinMode(WIO_KEY_C, INPUT_PULLUP);
 
    lis.begin(Wire1);
    lis.setOutputDataRate(LIS3DHTR_DATARATE_25HZ);
    lis.setFullScaleRange(LIS3DHTR_RANGE_2G);

    float x_raw = lis.getAccelerationX();
    float y_raw = lis.getAccelerationY();
    float z_raw = lis.getAccelerationZ();
    accelerator_readings[0] = x_raw; //store x-axis readings
    accelerator_readings[1] = y_raw; //store y-axis readings
    accelerator_readings[2] = z_raw; //store z-axis readings
 
// Serial.print("Attempting to connect to SSID: ");
// Serial.println(ssid);
    WiFi.begin(ssid, password);
 
    tft.begin();
    tft.setRotation(3);
    tft.fillScreen(TFT_BLACK);
    tft.setFreeFont(FMB12);
    tft.setCursor((320 - tft.textWidth("Connecting to Wi-Fi.."))/2, 120);
    tft.print("Connecting to Wi-Fi..");
 
    // attempt to connect to Wifi network:
    while (WiFi.status() != WL_CONNECTED) { 
       
// Serial.print(".");
        // wait 1 second for re-trying
        delay(1000);
    }
 
// Serial.print("Connected to ");
// Serial.println(ssid);
 
    tft.fillScreen(TFT_BLACK);
    tft.setCursor((320 - tft.textWidth("Connected!"))/2, 120);
    tft.print("Connected!");
 
    getFirstData();
}
 
void loop()
{ 
       
    int val_first = analogRead(WIO_MIC);
    float x_raw = lis.getAccelerationX();
    float y_raw = lis.getAccelerationY();
    float z_raw = lis.getAccelerationZ();
    int val_next = analogRead(WIO_MIC);

    if (abs(val_first - val_next) >= 100){ 
       
      Serial.println("send message!");
      }
    if (digitalRead(WIO_KEY_A) == LOW) { 
       
      Serial.println("A Key pressed");
     }
    if (digitalRead(WIO_KEY_B) == LOW) { 
       
      Serial.println("B Key pressed");
     }
    if (digitalRead(WIO_KEY_C) == LOW) { 
       
      Serial.println("C Key pressed");
     }
    
    if (abs(accelerator_readings[0] - x_raw) >= 0.1 && abs(accelerator_readings[1] - y_raw) >= 0.1 && abs(accelerator_readings[2] - z_raw) >= 0.1){ 
       
      // Turning on the LCD backlight
      digitalWrite(LCD_BACKLIGHT, HIGH);
      getFirstData();
      delay(3000);
      getLastData();
      delay(3000);
    }
    else { 
       
      // Turning off the LCD backlight
      digitalWrite(LCD_BACKLIGHT, LOW);
      delay(500);
      }
      
    for (uint8_t i = 0; i<3; i++){ 
       
        accelerator_readings[i] = 0.0; //this is used to remove the first read variable
      }
    
    accelerator_readings[0] = x_raw; //store x-axis readings
    accelerator_readings[1] = y_raw; //store y-axis readings
    accelerator_readings[2] = z_raw; //store z-axis readings
}
 
void getFirstData() { 
       
// Serial.println("\nStarting connection to server...");
    if (!client.connect(server, 9000)) { 
       
// Serial.println("Connection failed!");
        tft.fillScreen(TFT_BLACK);
        tft.setCursor((320 - tft.textWidth("Connection failed!"))/2, 120);
        tft.print("Connection failed!");
    } else { 
       
// Serial.println("Connected to server!");
 
        // Make a HTTP request:
        String postRequest =(String)("GET ") + "/ HTTP/1.1\r\n" + "Connection: close\r\n\r\n";  
// Serial.println(postRequest); 
        client.print(postRequest);

        while (client.connected()) { 
       
            String line = client.readStringUntil('\n');
            if (line == "\r") { 
       
// Serial.println("headers received");
                break;
            }
        }
 
        while(client.available())
        { 
       
          String line = client.readStringUntil('\r');
          data = line;
        }
// Serial.println(data);
        client.stop();
// Serial.println("closing connection");
    }
 
    //ArduinoJson to parse data, plesae check ArduinoJson for more info
    const size_t capacity = JSON_OBJECT_SIZE(5) + 100;
    DynamicJsonDocument doc(capacity);
    deserializeJson(doc, data);
 
    float temperature = doc["temperature"];
    float pressure = doc["pressure"];
    float humidity = doc["humidity"];
 
// -----------------LCD---------------------
    tft.setFreeFont(FF17);
    tft.setTextColor(tft.color565(224,225,232));
    tft.drawString("Current Data At Home",20,10);
 
    tft.fillRoundRect(10, 45, 300, 55, 5, tft.color565(40,40,86));
    tft.fillRoundRect(10, 105, 300, 55, 5, tft.color565(40,40,86));
    tft.fillRoundRect(10, 165, 300, 55, 5, tft.color565(40,40,86));
 
    tft.setFreeFont(FM9);
    tft.drawString("temperature:", 75, 50);
    tft.drawString("pressure:",75, 110);
    tft.drawString("humidity:",75, 170);
 
    tft.setFreeFont(FMB12);
    tft.setTextColor(TFT_RED);
    tft.drawFloat(temperature,2 , 140, 75);
    tft.setTextColor(tft.color565(224,225,232));
    tft.drawFloat(pressure,2 , 140, 135);
    tft.setTextColor(TFT_GREEN);
    tft.drawFloat(humidity,2 , 140, 195);

    tft.drawString("℃", 210, 75);
    tft.drawString("KPa",210, 135);
    tft.drawString("%",210, 195);
}

void getLastData() { 
       
// Serial.println("\nStarting connection to server...");
    if (!client.connect(server, 9000)) { 
       
// Serial.println("Connection failed!");
        tft.fillScreen(TFT_BLACK);
        tft.setCursor((320 - tft.textWidth("Connection failed!"))/2, 120);
        tft.print("Connection failed!");
    } else { 
       
// Serial.println("Connected to server!");

        // Make a HTTP request:
        String postRequest =(String)("GET ") + "/ HTTP/1.1\r\n" + "Connection: close\r\n\r\n";  
// Serial.println(postRequest); 
        client.print(postRequest);

        while (client.connected()) { 
       
            String line = client.readStringUntil('\n');
            if (line == "\r") { 
       
// Serial.println("headers received");
                break;
            }
        }
 
        while(client.available())
        { 
       
          String line = client.readStringUntil('\r');
          data = line;
        }
// Serial.println(data);
        client.stop();
// Serial.println("closing connection");
    }
 
    //ArduinoJson to parse data, plesae check ArduinoJson for more info
    const size_t capacity = JSON_OBJECT_SIZE(5) + 100;
    DynamicJsonDocument doc(capacity);
    deserializeJson(doc, data);

    float humidity = doc["humidity"];
    float gas = doc["gas"];
    String updataTime = doc["updataTime"];
 
// -----------------LCD---------------------
    tft.setFreeFont(FF17);
    tft.setTextColor(tft.color565(224,225,232));
    tft.drawString("Current Data At Home",20,10);
 
    tft.fillRoundRect(10, 45, 300, 55, 5, tft.color565(40,40,86));
    tft.fillRoundRect(10, 105, 300, 55, 5, tft.color565(40,40,86));
    tft.fillRoundRect(10, 165, 300, 55, 5, tft.color565(40,40,86));
 
    tft.setFreeFont(FM9);
    tft.drawString("humidity:", 75, 50);
    tft.drawString("gas:",75, 110);
    tft.drawString("updataTime:",75, 170);
 
    tft.setFreeFont(FMB12);
    tft.setTextColor(TFT_RED);
    tft.drawFloat(humidity,2 , 140, 75);
    tft.setTextColor(tft.color565(224,225,232));
    tft.drawFloat(gas,2 , 140, 135);
    tft.setTextColor(TFT_GREEN);
    tft.drawString(updataTime , 30, 195);

    tft.drawString("%", 210, 75);
    tft.drawString("Kohms",210, 135);
}

成功上传后,打开串口监视器:
在这里插入图片描述

下面,我们来看看Python的具体实现

使用Python读取串口数据并做出相应决策

WEB端增加保存数据的功能

因为需要发送邮件,所以我把传感器接收到的数据先存放到一个txt文本文件里,发送邮件时,直接发送这个文本文件即可

在views.py里:

def index(request):
    datas = getDatas()
    content = { 
       
        'temperature':datas[0],
        'pressure':datas[1],
        'humidity':datas[2],
        'gas':datas[3],
        'updataTime':datas[4],
    }
    jsonData = json.dumps(content)
    with open("D:\TemperatureHumidityPressureGasData.txt", "w" 
锐单商城拥有海量元器件数据手册IC替代型号,打造电子元器件IC百科大全!

相关文章