java物联网第四天 智慧农业物联网下
时间:2023-08-27 23:07:00
5.5萤石云API介绍播放接入指南
我们可以编程和开发海康威视的摄像头进行远程控制。海康威视提供了一套api供我们远程调用,也提供了一个网站去管理我们自己的网络摄像头,这个网站就是萤石云
https://www.ys7.com/
在这个网站上,你可以管理和开发你购买的摄像头
注册-登录后找到开发者服务,可以在这里添加自己的摄像头进行管理
点击接口测试调试功能
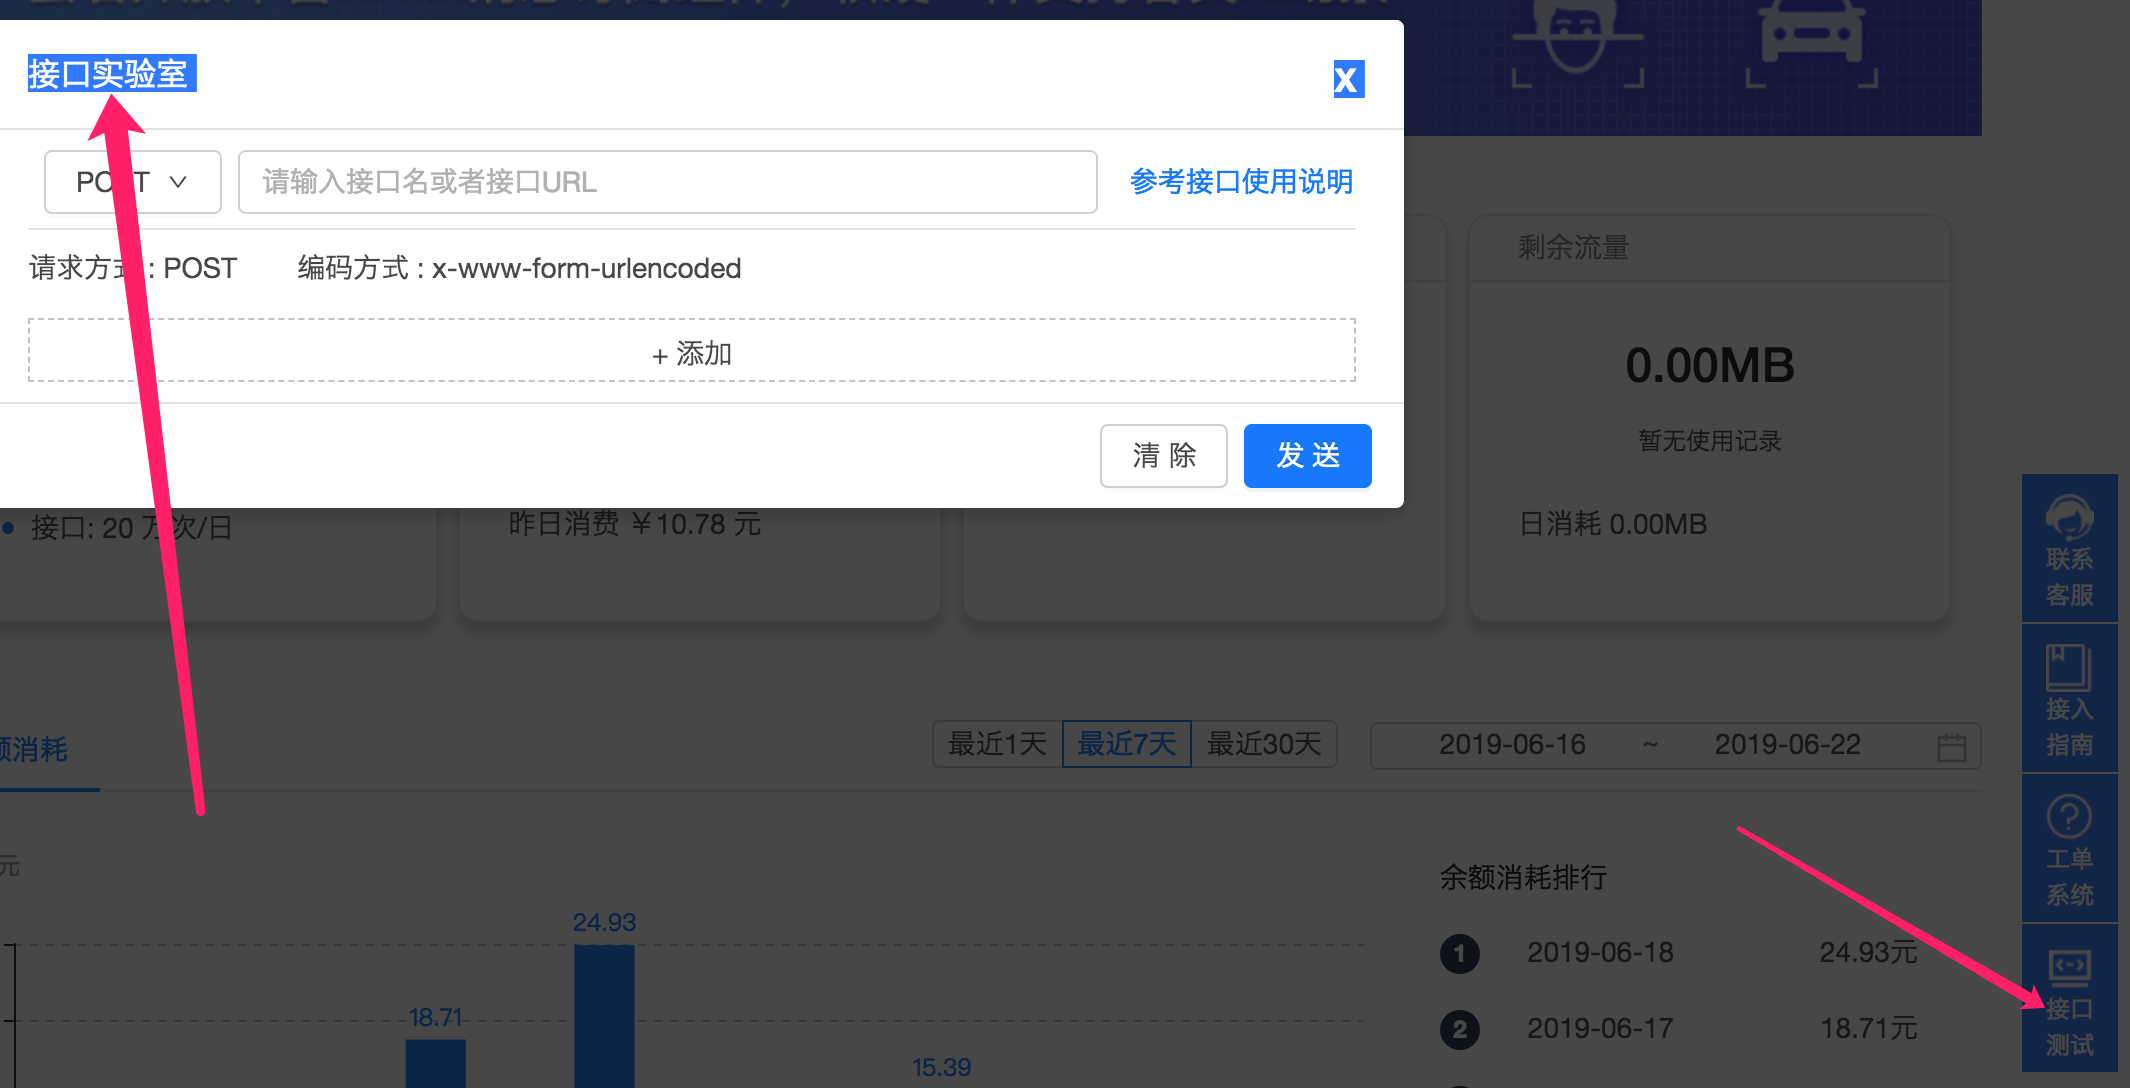
详细开发api在https://open.ys7.com/doc/zh/
AccessToken:要根据这个token视频显示和控制,但这是token七天 它将过期,因此需要每七天调用接口重新获得一次
根据appKey和secret获取accessToken
-
接口功能
该接口用于管理员账户appKey和secret获取accessToken,appKey和secret可以在官网-开发者服务-我的应用中找到
注:获得的accessToken有效期为7天,请在即将过期或者接口报错10002重新获取时,不要频繁调用,频繁调用会被拉入限制黑名单。
-
请求地址
https://open.ys7.com/api/lapp/token/get -
请求方式
POST -
请求参数
| 参数名 | 类型 | 描述 | 是否必选 |
|---|---|---|---|
| appKey | String | appKey | Y |
| appSecret | String | appSecret | Y |
UIKit简介
UI组件(UIKit)含萤石开放平台推出UI二次开发组件,全称Ezviz UIKit(简称EZUIKit),视频功能可以通过三行代码集成,有四个版本:iOS、Android、JS(Web/H5)、ActiveX(IE)。
UIKit自带播放器,只需使用萤石播放链接(URL)实时视频预览、视频回放、播放URL可在开发者服务中心的设备管理中获得,也可按规定自行拼接
uikit大多数情况下直接引入非常方便js,使用三行代码完成视频显示
下载地址:https://open.ys7.com/mobile/download.html
代码示例——demo-live.html
// 首先引入js // 页面创建video标签 // 直播源地址初始化 var player = new EZUIKit.EZUIPlayer('myPlayer'); // 播放 player.play(); // 结束 player.stop();
5.5.3.萤石云云台控制API介绍
http接口:-设备:有很多接口每个人都会使用
接口调试方法:使用接口调试工具postman,debugapi进行
从萤石云中获得前三个参数
后两个参数代表操作模式
开始云台控制
-
接口功能
开始云台控制设备,云台控制开始后,其他操作前必须调用云台控制接口,包括云台向其他方向旋转
-
请求地址
https://open.ys7.com/api/lapp/device/ptz/start -
请求方式
POST -
子账户token要求最小权限
"Permission":"Ptz""Resource":"Cam:序列号:通道号" -
请求参数
| 参数名 | 类型 | 描述 | 是否必选 |
|---|---|---|---|
| accessToken | String | 获得授权过程access_token | Y |
| deviceSerial | String | 设备序列号,有英文字母的设备序列号,字母需要大写 | Y |
| channelNo | int | 通道号 | Y |
| direction | int | 操作命令:0-上,1-下,2-左,3-右,4-左,5-左,6-右,7-右,8-放大,9-缩小,10-近焦距,11-远焦距 |
Y |
| speed | int | 云台速度:0-慢,1-适中,2-快 |
Y |
预设点:开机后可设置摄像头的初始位置,预设点序号,C6设备是1-12,该参数需要开发者自行保存
如果开发人员没有摄像头,甲方需要提供相应的设备,萤石云账户需要移交给开发人员,因为开发所需的参数可以在萤石云管理界面找到。甲方需要做的是保持测试摄像头24小时启动
5.5.4.项目对接海康威视摄像头
1)有摄像头的数据库表
2)有摄像头的管理界面
3)当用户登录并打开摄像头监控页面时,根据用户找到相应的摄像头并返回数据库
4)在页面根据摄像头信息使用uikit进行渲染
购买摄像头之后,在萤石云申请对应的秘钥,方便下一步进行网络控制。
根据appKey和secret获取accessToken接口
而播放以及控制必须要的三个参数为accessToken,deviceSerial,channelNo
播放地址url
实现步骤:
1)
2)要从数据库把摄像头的信息取回来
3)页面上定义一个vedio标签,其中的src属性指定播放路径
4)在js中让代码执行var player1 = new EZUIPlayer(‘player1’);
可能会遇到的问题:通常是播放的token过期,需要重新去官网申请
5.5.5.使用阿里图标库制作摄像头云台对摄像头进行控制
这里主要想让大家学习的是如何使用第三方的图标库
阿里图标库:https://www.iconfont.cn/
使用说明:https://blog.csdn.net/sanlingwu/article/details/83097641
<div class="layui-text-bottom layui-row vedio-button-select">
    <button lay-submit="" lay-filter="add" onclick="control(0)">上button>
    <button lay-submit="" lay-filter="add" onclick="control(1)">下button>
    <button lay-submit="" lay-filter="add" onclick="control(2)">左button>
    <button lay-submit="" lay-filter="add" onclick="control(3)">右button>

    <button lay-submit="" lay-filter="add" onclick="stop()">停止button>
    <button lay-submit="" lay-filter="add" onclick="control(8)">放大button>
    <button lay-submit="" lay-filter="add" onclick="control(9)">缩小button>
    <button lay-submit="" lay-filter="add" onclick="control(10)">近焦button>
    <button lay-submit="" lay-filter="add" onclick="control(11)">远焦button>
    <button lay-submit="" lay-filter="add" onclick="capture()">抓拍button>
    <div style="float: left;">
        <select id="speed3" name="speed" lay-verify="required" class='vedio-select layui-btn layui-btn-normal layui-col-sm2 form-control input-sm' data-bv-notempty='true'>
            <option value="0">慢速option>
            <option value="1">正常option>
            <option value="2">快速option>
        select>

    div>
div>
//开始控制
//0-上,1-下,2-左,3-右,4-左上,5-左下,6-右上,7-右下,8-放大,9-缩小,10-近焦距,11-远焦距
//默认为步进,点一下就停止
var control=function (direction) {

    data.direction=direction;
    data.speed='0';
    layui.use(['jquery', 'layer'], function(){

        var $ = layui.$
            ,layer = layui.layer;
        var speed = $("#speed").val();
        if (speed != null && speed != '') {

            data.speed=speed;
        }

        var moving = $("#moving").val();
        if (moving != null&& moving != '') {

            //连动
            if (moving == 1) {

                $.post('https://open.ys7.com/api/lapp/device/ptz/start',data,function(res){

                    if(res.code==200){

                        layer.msg(res.msg, {
        time: 2000});
                    }else{

                        layer.msg(res.msg, {
        time: 2000});
                    }
                },'json');

            } else {

                //步进,动一下就停
                $.post('https://open.ys7.com/api/lapp/device/ptz/start',data,function(res){


                },'json');
                $.post('https://open.ys7.com/api/lapp/device/ptz/stop',data,function(res){

                    if(res.code==200){

                        layer.msg(res.msg, {
        time: 2000});
                    }else{

                        layer.msg(res.msg, {
        time: 2000});
                    }
                },'json');
            }
        }
        return false;
    });
}
如果摄像头支持抓拍,可以使用如下代码:
//抓拍
var capture=function () {

    layui.use(['jquery', 'layer'], function(){

        var $ = layui.$
            ,layer = layui.layer;
        $.post('https://open.ys7.com/api/lapp/device/capture',data,function(res){

            if(res.code==200){

                layer.msg(res.msg, {
        time: 2000});
                //抓图成功后将这个地址传递到后台,下载下来保存到阿里云
                console.log(res.data.picUrl)
                $.get('/vedios/savePic?picUrl='+res.data.picUrl,function (res) {

                    ayer.msg('抓图成功', {
        time: 2000});
                })
            }else{

                layer.msg(res.msg, {
        time: 2000});
            }
        },'json');
    })
}
抓拍的后台逻辑:
/** * 抓取图片,并上传oss * https://open.ys7.com/doc/zh/book/index/device_option.html#device_option-api4 * 请求地址:https://open.ys7.com/api/lapp/device/capture * 请求方式:POST * 请求参数:accessToken=at.12xp95k63bboast3aq0g5hg22q468929&deviceSerial=427734888&channelNo=2 * 返回数据 * { * "data": { * "picUrl": "http://img.ys7.com//group2/M00/74/22/CmGdBVjBVDCAaFNZAAD4cHwdlXA833.jpg" * }, * "code": "200", * "msg": "操作成功!" * } * @param * @return * * http://localhost:9001/vedios/savePic?picUrl=111 */
@GetMapping("/savePic")
@ApiOperation(value = "将抓取的图片保存到阿里云")
public void capture(String picUrl)throws Exception{

    //System.out.println(picUrl);
    HttpGet httpGet = new HttpGet("https://img13.360buyimg.com/n5/jfs/t17446/352/1415143705/203490/68cdb4ee/5ac74800N0824a445.jpg");
    httpGet.setConfig(requestConfig);
    CloseableHttpResponse httpResponse = httpClient.execute(httpGet);
    HttpEntity httpEntity = httpResponse.getEntity();

    if (httpEntity!=null) {

        System.out.println("ContentType:"+httpEntity.getContentType().getValue());
        InputStream inputStream = httpEntity.getContent();

        FileService fileService = fileServiceFactory.getFileService("ALIYUN");
        //InputStream转换MultipartFile
        MultipartFile multipartFile = new MultipartFileDto("temp.jpg","temp.jpg",httpEntity.getContentType().getValue(), inputStream);
        fileService.upload(multipartFile);
    }
}
将file包装成MultipartFile
package com.topwulian.dto;

import org.springframework.util.FileCopyUtils;
import org.springframework.web.multipart.MultipartFile;

import java.io.ByteArrayInputStream;
import java.io.File;
import java.io.IOException;
import java.io.InputStream;

/** * @Author: szz * @Date: 2019/1/16 下午4:33 * @Version 1.0 * * 负责将InputStream转换MultipartFile,可以少引一个jar包,本来用的是spring-test-4.3.9中的MockMultipartFile,直接提取出来使用 */
public class MultipartFileDto implements MultipartFile {

    private final String name;

    private String originalFilename;

    private String contentType;

    private final byte[] content;


    /** * Create a new MultipartFileDto with the given content. * @param name the name of the file * @param content the content of the file */
    public MultipartFileDto(String name, byte[] content) {

        this(name, "", null, content);
    }

    /** * Create a new MultipartFileDto with the given content. * @param name the name of the file * @param contentStream the content of the file as stream * @throws IOException if reading from the stream failed */
    public MultipartFileDto(String name, InputStream contentStream) throws IOException {

        this(name, "", null, FileCopyUtils.copyToByteArray(contentStream));
    }

    /** * Create a new MultipartFileDto with the given content. * @param name the name of the file * @param originalFilename the original filename (as on the client's machine) * @param contentType the content type (if known) * @param content the content of the file */
    public MultipartFileDto(String name, String originalFilename, String contentType, byte[] content) {

        this.name = name;
        this.originalFilename = (originalFilename != null ? originalFilename : "");
        this.contentType = contentType;
        this.content = (content != null ? content : new byte[0]);
    }

    /** * Create a new MultipartFileDto with the given content. * @param name the name of the file * @param originalFilename the original filename (as on the client's machine) * @param contentType the content type (if known) * @param contentStream the content of the file as stream * @throws IOException if reading from the stream failed */
    public MultipartFileDto(String name, String originalFilename, String contentType, InputStream contentStream)
            throws IOException {


        this(name, originalFilename, contentType, FileCopyUtils.copyToByteArray(contentStream));
    }

    @Override
    public String getName() {

        return this.name;
    }

    @Override
    public String getOriginalFilename() {

        return this.originalFilename;
    }

    @Override
    public String getContentType() {

        return this.contentType;
    }

    @Override
    public boolean isEmpty() {

        return (this.content.length == 0);
    }

    @Override
    public long getSize() {

        return this.content.length;
    }

    @Override
    public byte[] getBytes() throws IOException {

        return this.content;
    }

    @Override
    public InputStream getInputStream() throws IOException {

        return new ByteArrayInputStream(this.content);
    }

    @Override
    public void transferTo(File dest) throws IOException, IllegalStateException {

        FileCopyUtils.copy(this.content, dest);
    }

}
5.5.6.摄像头不支持远程截图的另外一种玩法
如果你购买摄像头不支持远程截图,就需要其他办法
在摄像头购买后,可以在局域网中对它进行配置,我购买的摄像头支持配置截图并且上传到windows的ftp服务器这样一个功能,所以我只能迂回作战,先使用内置的上传ftp的功能将图片传到ftp上,再去监控ftp服务器,把最新截取的图片地址保存到云服务器的数据库,这样就能管理每个摄像头所截取的图片啦。
5.5.7.监控ftp中设备截图变化程序的制作
通过查看萤石接口平台:https://open.ys7.com/doc/zh/book/index/device_option.html#device_option-api4
得到摄像头截图的接口:
设备抓拍图片
-
接口功能
抓拍设备当前画面,
该接口仅适用于IPC或者关联IPC的DVR设备,该接口并非预览时的截图功能。海康型号设备可能不支持萤石协议抓拍功能,使用该接口可能返回不支持或者超时。注意:设备抓图能力有限,请勿频繁调用,频繁调用将会被拉入限制黑名单,建议调用的间隔为4s左右。
-
请求地址
https://open.ys7.com/api/lapp/device/capture -
请求方式
POST -
子账户token请求所需最小权限
"Permission":"Capture""Resource":"Cam:序列号:通道号" -
请求参数
| 参数名 | 类型 | 描述 | 是否必选 |
|---|---|---|---|
| accessToken | String | 授权过程获取的access_token | Y |
| deviceSerial | String | 设备序列号,存在英文字母的设备序列号,字母需为大写 | Y |
| channelNo | int | 通道号,IPC设备填写1 | Y |
- HTTP请求报文
POST /api/lapp/device/capture HTTP/1.1
Host: open.ys7.com
Content-Type: application/x-www-form-urlencoded

accessToken=at.12xp95k63bboast3aq0g5hg22q468929&deviceSerial=427734888&channelNo=1
< 

