实战:车牌识别之车牌定位
时间:2023-07-21 12:07:00
点击上方“小白学视觉”,选择加"星标"或“置顶”
重磅干货,第一时间送达 本文转自|3D视觉工坊
从这一节开始,我们开始尝试做车牌识别的算法部分。从上一节的基本框架图可以看出,要做车牌识别,第一步是了解车牌在图片中的位置!
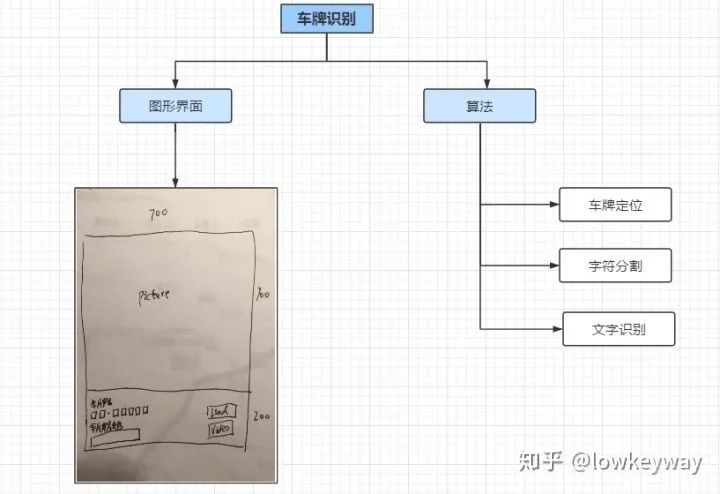
所以,长征的第一步,让我们从车牌定位开始。
车牌定位
寻找车牌对人类大脑来说真的是一件小事,这也是经过磨练的结果。但这对计算机来说可能并不那么简单。让我们来看看什么是物理世界的车牌,以及它们的特点。
以中国车牌为例,车牌的种类也很复杂。汽车类型有:
小型车号牌
大型车号牌
挂车号牌
使领馆车牌
港澳出境车号牌
教练号牌
警车号牌
消防号牌
等等。。。
从车牌背景上看:
蓝色
黄色
绿色
白色
黑色
黄色 绿色
面对如此多的分类,我最害怕的是一开始就想做一个大而完整的系统。敏捷发展是王道,我们使用最常见的小型车牌之一 以蓝色为例,找出它的特点:
1. 尺寸
宽440mm×高140mm的矩形
2. 颜色
背景为蓝色,显示内容为白色
3. 内容
以“沪A-以88888为例,格式为汉字(省/直辖市缩写) 大写字母(市/区缩写) “点(-)” 五位大写字母与数字的组合(随机车牌号)
嗯,在了解了车牌的基本内容后,我们必须开始思考如何在数字图像上找到车牌。在这里,我们只使用两个有用的信息大小和颜色(内容部分很难放在后面)。
由于图片的大小和车牌的距离,只能使用其比例和矩形特征。我们可以尝试找到宽高比(2, 4)之间的矩形。所以车牌在这些矩形中。
颜色部分可以用来做精调,可以在上面的矩形里找到符合蓝色覆盖比例的部分。这样一可以剔除那些非蓝色的矩形,而来可以缩小矩形范围提炼精确的车牌内容。
为实现以上两大思路,具体可分为以下七个步骤:
1. 图片缩放到固定的大小
由于加载图片尺寸的不同,收缩到固定尺寸的最重要原因是方便模糊、打开和关闭操作,不同的图片可以用统一的核心尺寸处理。
def zoom(w, h, wMax, hMax): # if w <= wMax and h <= hMax: # return w, h widthScale = 1.0 * wMax / w heightScale = 1.0 * hMax / h scale = min(widthScale, heightScale) resizeWidth = int(w * scale) resizeHeight = int(h * scale) return resizeWidth, resizeHeight # Step1: Resize img = np.copy(self.imgOri) h, w = img.shape[:2] imgWidth, imgHeight = zoom(w, h, self.maxLength, self.maxLength) print(w, h, imgWidth, imgHeight) img =cv.resize(img, (imgWidth, imgHeight), interpolation=cv.INTER_AREA) cv.imshow("imgResize", img) 2. 图片预处理
图片预处理部分是最重要的,所有的操作都是为了有效地寻找包络服务,其中使用高斯模糊来降低噪音,打开操作和加权来加强对比度、二值化和Canny边缘检测可以找到物体的轮廓,用先闭后开的操作找到整个矩形。
# Step2: Prepare to find contours                          img = cv.GaussianBlur(img, (3, 3), 0)                        imgGary = cv.cvtColor(img, cv.COLOR_BGR2GRAY)                    cv.imshow("imgGary", imgGary)                         &bsp;

kernel = np.ones((20, 20), np.uint8)
imgOpen = cv.morphologyEx(imgGary, cv.MORPH_OPEN, kernel)
cv.imshow("imgOpen", imgOpen)

imgOpenWeight = cv.addWeighted(imgGary, 1, imgOpen, -1, 0)
cv.imshow("imgOpenWeight", imgOpenWeight)

ret, imgBin = cv.threshold(imgOpenWeight, 0, 255, cv.THRESH_OTSU + cv.THRESH_BINARY)
cv.imshow("imgBin", imgBin)

imgEdge = cv.Canny(imgBin, 100, 200)
cv.imshow("imgEdge", imgEdge)

kernel = np.ones((10, 19), np.uint8)
imgEdge = cv.morphologyEx(imgEdge, cv.MORPH_CLOSE, kernel)
imgEdge = cv.morphologyEx(imgEdge, cv.MORPH_OPEN, kernel)
cv.imshow("imgEdgeProcessed", imgEdge)
3. 寻找包络
有了上面的处理,寻找包络就简单多了。OpenCV的一个接口findContours就搞定!
# Step3: Find Contours
image, contours, hierarchy = cv.findContours(imgEdge, cv.RETR_TREE, cv.CHAIN_APPROX_SIMPLE)
contours = [cnt for cnt in contours if cv.contourArea(cnt) > self.minArea]
4. 删除一些物理尺寸不满足的包络
轮询所有包络,通过minAreaRect找到他们对应的最小矩形。先通过宽、高比来删除一些不符合条件的。
# Step4: Delete some rects
carPlateList = []
imgDark = np.zeros(img.shape, dtype = img.dtype)
for index, contour in enumerate(contours):
	rect = cv.minAreaRect(contour) # [中心(x,y), (宽,高), 旋转角度]
	w, h = rect[1]
	if w < h:
		w, h = h, w
	scale = w/h
	if scale > 2 and scale < 4:
		# color = (random.randint(0, 255), random.randint(0, 255), random.randint(0, 255))
		color = (255, 255, 255)
		carPlateList.append(rect)
		cv.drawContours(imgDark, contours, index, color, 1, 8)

		box = cv.boxPoints(rect)  # Peak Coordinate
		box = np.int0(box)
		# Draw them out
		cv.drawContours(imgDark, [box], 0, (0, 0, 255), 1)

cv.imshow("imgGaryContour", imgDark)
print("Vehicle number: ", len(carPlateList))
5. 重映射
这里做的是仿射变换,为什么要做这个呢?原因是因为拍摄角度的原因,我们得到的矩形通常是由写偏角的,这里希望把它们摆正。
# Step5: Rect rectify
imgPlatList = []
for index, carPlat in enumerate(carPlateList):
	if carPlat[2] > -1 and carPlat[2] < 1:
		angle = 1
	else:
		angle = carPlat[2]

	carPlat = (carPlat[0], (carPlat[1][0] + 5, carPlat[1][1] + 5), angle)
	box = cv.boxPoints(carPlat)

	# Which point is Left/Right/Top/Bottom
	w, h = carPlat[1][0], carPlat[1][1]
	if w > h:
		LT = box[1]
		LB = box[0]
		RT = box[2]
		RB = box[3]
	else:
		LT = box[2]
		LB = box[1]
		RT = box[3]
		RB = box[0]

	for point in [LT, LB, RT, RB]:
		pointLimit(point, imgWidth, imgHeight)

	# Do warpAffine
	newLB = [LT[0], LB[1]]
	newRB = [RB[0], LB[1]]
	oldTriangle = np.float32([LT, LB, RB])
	newTriangle = np.float32([LT, newLB, newRB])
	warpMat = cv.getAffineTransform(oldTriangle, newTriangle)
	imgAffine = cv.warpAffine(img, warpMat, (imgWidth, imgHeight))
	cv.imshow("imgAffine" + str(index), imgAffine)
	print("Index: ", index)

	imgPlat = imgAffine[int(LT[1]):int(newLB[1]), int(newLB[0]):int(newRB[0])]
	imgPlatList.append(imgPlat)
	cv.imshow("imgPlat" + str(index), imgPlat)
需要注意的是这里用了boxPoints接口获取了矩形的四个点的坐标,需要通过这四个点坐标对应矩形的左上、右上、左下、右下四个点,才能给后面的warpAffine仿射变换做铺垫。
函数 cv2.minAreaRect() 返回一个Box2D结构rect:(最小外接矩形的中心(x,y),(宽度,高度),旋转角度),但是要绘制这个矩形,我们需要矩形的4个顶点坐标box, 通过函数 cv2.cv.BoxPoints() 获得,返回形式[ [x0,y0], [x1,y1], [x2,y2], [x3,y3] ]。得到的最小外接矩形的4个顶点顺序、中心坐标、宽度、高度、旋转角度(是度数形式,不是弧度数)的对应关系如下:
6. 定车牌颜色
基本思路就是把上面重映射后的图片转换到HSV空间,然后通过统计全部像素的个数以及单个颜色对应的个数,如果满足蓝色占了全部像素的1/3及以上的时候,就认为这是一个蓝色车牌。
#Step6: Find correct place by color.
colorList = []
for index, imgPlat in enumerate(imgPlatList):
	green = yellow = blue = 0
	imgHsv = cv.cvtColor(imgPlat, cv.COLOR_BGR2HSV)
	rows, cols = imgHsv.shape[:2]
	imgSize = cols * rows
	color = None

	for row in range(rows):
		for col in range(cols):
			H = imgHsv.item(row, col, 0)
			S = imgHsv.item(row, col, 1)
			V = imgHsv.item(row, col, 2)

			if 11 < H <= 34 and S > 34:
				yellow += 1
			elif 35 < H <= 99 and S > 34:
				green += 1
			elif 99 < H <= 124 and S > 34:
				blue += 1

	limit1 = limit2 = 0
	if yellow * 3 >= imgSize:
		color = "yellow"
		limit1 = 11
		limit2 = 34
	elif green * 3 >= imgSize:
		color = "green"
		limit1 = 35
		limit2 = 99
	elif blue * 3 >= imgSize:
		color = "blue"
		limit1 = 100
		limit2 = 124

	print("Image Index[", index, '], Color:', color)
	colorList.append(color)
	print(blue, green, yellow, imgSize)

	if color is None:
		continue
附:
HSV空间下的颜色判断关系表。
7. 根据颜色重新裁剪、筛选图片
我们知道了车牌颜色之后,就可以通过逐行、逐列扫描,把车牌精确到更小的范围,这样还可以通过宽高比剔除一些不正确的矩形,而且还得到了精确唯一车牌图像内容!
def accurate_place(self, imgHsv, limit1, limit2, color):
	rows, cols = imgHsv.shape[:2]
	left = cols
	right = 0
	top = rows
	bottom = 0

	# rowsLimit = 21
	rowsLimit = rows * 0.8 if color != "green" else rows * 0.5  # 绿色有渐变
	colsLimit = cols * 0.8 if color != "green" else cols * 0.5  # 绿色有渐变
	for row in range(rows):
		count = 0
		for col in range(cols):
			H = imgHsv.item(row, col, 0)
			S = imgHsv.item(row, col, 1)
			V = imgHsv.item(row, col, 2)
			if limit1 < H <= limit2 and 34 < S:# and 46 < V:
				count += 1
		if count > colsLimit:
			if top > row:
				top = row
			if bottom < row:
				bottom = row
	for col in range(cols):
		count = 0
		for row in range(rows):
			H = imgHsv.item(row, col, 0)
			S = imgHsv.item(row, col, 1)
			V = imgHsv.item(row, col, 2)
			if limit1 < H <= limit2 and 34 < S:# and 46 < V:
				count += 1
		if count > rowsLimit:
			if left > col:
				left = col
			if right < col:
				right = col
	return left, right, top, bottom

# Step7: Resize vehicle img.
left, right, top, bottom = self.accurate_place(imgHsv, limit1, limit2, color)
w = right - left
h = bottom - top

if left == right or top == bottom:
	continue

scale = w/h
if scale < 2 or scale > 4:
	continue


needAccurate = False
if top >= bottom:
	top = 0
	bottom = rows
	needAccurate = True
if left >= right:
	left = 0
	right = cols
	needAccurate = True
# imgPlat[index] = imgPlat[top:bottom, left:right] \
# if color != "green" or top < (bottom - top) // 4 \
# else imgPlat[top - (bottom - top) // 4:bottom, left:right]
imgPlatList[index] = imgPlat[top:bottom, left:right]
cv.imshow("Vehicle Image " + str(index), imgPlatList[index])
好了,我们终于拿到了最终结果,下一步就是把这里面的内容提取出来吧!
目前遇到的问题:
1. 获取矩形如果倾斜有角度,仿射变换后更偏了,不知道后面内容提取容易分离不。
全部代码:
import cv2 as cv
import numpy as np
from numpy.linalg import norm
import matplotlib.pyplot as plt
import sys, os, json, random


class LPRAlg:
	maxLength 	= 700
	minArea 	= 2000
	def __init__(self, imgPath = None):
		if imgPath is None:
			print("Please input correct path!")
			return None

		self.imgOri = cv.imread(imgPath)
		if self.imgOri is None:
			print("Cannot load this picture!")
			return None

		# cv.imshow("imgOri", self.imgOri)

	def accurate_place(self, imgHsv, limit1, limit2, color):
		rows, cols = imgHsv.shape[:2]
		left = cols
		right = 0
		top = rows
		bottom = 0

		# rowsLimit = 21
		rowsLimit = rows * 0.8 if color != "green" else rows * 0.5  # 绿色有渐变
		colsLimit = cols * 0.8 if color != "green" else cols * 0.5  # 绿色有渐变
		for row in range(rows):
			count = 0
			for col in range(cols):
				H = imgHsv.item(row, col, 0)
				S = imgHsv.item(row, col, 1)
				V = imgHsv.item(row, col, 2)
				if limit1 < H <= limit2 and 34 < S:# and 46 < V:
					count += 1
			if count > colsLimit:
				if top > row:
					top = row
				if bottom < row:
					bottom = row
		for col in range(cols):
			count = 0
			for row in range(rows):
				H = imgHsv.item(row, col, 0)
				S = imgHsv.item(row, col, 1)
				V = imgHsv.item(row, col, 2)
				if limit1 < H <= limit2 and 34 < S:# and 46 < V:
					count += 1
			if count > rowsLimit:
				if left > col:
					left = col
				if right < col:
					right = col
		return left, right, top, bottom

	def findVehiclePlate(self):
		def zoom(w, h, wMax, hMax):
			# if w <= wMax and h <= hMax:
			# 	return w, h
			widthScale = 1.0 * wMax / w
			heightScale = 1.0 * hMax / h

			scale = min(widthScale, heightScale)

			resizeWidth = int(w * scale)
			resizeHeight = int(h * scale)

			return resizeWidth, resizeHeight

		def pointLimit(point, maxWidth, maxHeight):
			if point[0] < 0:
				point[0] = 0
			if point[0] > maxWidth:
				point[0] = maxWidth
			if point[1] < 0:
				point[1] = 0
			if point[1] > maxHeight:
				point[1] = maxHeight

		if self.imgOri is None:
			print("Please load picture frist!")
			return False

		# Step1: Resize
		img = np.copy(self.imgOri)
		h, w = img.shape[:2]
		imgWidth, imgHeight = zoom(w, h, self.maxLength, self.maxLength)
		print(w, h, imgWidth, imgHeight)
		img =cv.resize(img, (imgWidth, imgHeight), interpolation=cv.INTER_AREA)
		cv.imshow("imgResize", img)

		# Step2: Prepare to find contours
		img = cv.GaussianBlur(img, (3, 3), 0)
		imgGary = cv.cvtColor(img, cv.COLOR_BGR2GRAY)
		cv.imshow("imgGary", imgGary)

		kernel = np.ones((20, 20), np.uint8)
		imgOpen = cv.morphologyEx(imgGary, cv.MORPH_OPEN, kernel)
		cv.imshow("imgOpen", imgOpen)

		imgOpenWeight = cv.addWeighted(imgGary, 1, imgOpen, -1, 0)
		cv.imshow("imgOpenWeight", imgOpenWeight)

		ret, imgBin = cv.threshold(imgOpenWeight, 0, 255, cv.THRESH_OTSU + cv.THRESH_BINARY)
		cv.imshow("imgBin", imgBin)

		imgEdge = cv.Canny(imgBin, 100, 200)
		cv.imshow("imgEdge", imgEdge)

		kernel = np.ones((10, 19), np.uint8)
		imgEdge = cv.morphologyEx(imgEdge, cv.MORPH_CLOSE, kernel)
		imgEdge = cv.morphologyEx(imgEdge, cv.MORPH_OPEN, kernel)
		cv.imshow("imgEdgeProcessed", imgEdge)

		# Step3: Find Contours
		image, contours, hierarchy = cv.findContours(imgEdge, cv.RETR_TREE, cv.CHAIN_APPROX_SIMPLE)
		contours = [cnt for cnt in contours if cv.contourArea(cnt) > self.minArea]

		# Step4: Delete some rects
		carPlateList = []
		imgDark = np.zeros(img.shape, dtype = img.dtype)
		for index, contour in enumerate(contours):
			rect = cv.minAreaRect(contour) # [中心(x,y), (宽,高), 旋转角度]
			w, h = rect[1]
			if w < h:
				w, h = h, w
			scale = w/h
			if scale > 2 and scale < 4:
				# color = (random.randint(0, 255), random.randint(0, 255), random.randint(0, 255))
				color = (255, 255, 255)
				carPlateList.append(rect)
				cv.drawContours(imgDark, contours, index, color, 1, 8)

				box = cv.boxPoints(rect)  # Peak Coordinate
				box = np.int0(box)
				# Draw them out
				cv.drawContours(imgDark, [box], 0, (0, 0, 255), 1)

		cv.imshow("imgGaryContour", imgDark)
		print("Vehicle number: ", len(carPlateList))

		# Step5: Rect rectify
		imgPlatList = []
		for index, carPlat in enumerate(carPlateList):
			if carPlat[2] > -1 and carPlat[2] < 1:
				angle = 1
			else:
				angle = carPlat[2]

			carPlat = (carPlat[0], (carPlat[1][0] + 5, carPlat[1][1] + 5), angle)
			box = cv.boxPoints(carPlat)

			# Which point is Left/Right/Top/Bottom
			w, h = carPlat[1][0], carPlat[1][1]
			if w > h:
				LT = box[1]
				LB = box[0]
				RT = box[2]
				RB = box[3]
			else:
				LT = box[2]
				LB = box[1]
				RT = box[3]
				RB = box[0]

			for point in [LT, LB, RT, RB]:
				pointLimit(point, imgWidth, imgHeight)

			# Do warpAffine
			newLB = [LT[0], LB[1]]
			newRB = [RB[0], LB[1]]
			oldTriangle = np.float32([LT, LB, RB])
			newTriangle = np.float32([LT, newLB, newRB])
			warpMat = cv.getAffineTransform(oldTriangle, newTriangle)
			imgAffine = cv.warpAffine(img, warpMat, (imgWidth, imgHeight))
			cv.imshow("imgAffine" + str(index), imgAffine)
			print("Index: ", index)

			imgPlat = imgAffine[int(LT[1]):int(newLB[1]), int(newLB[0]):int(newRB[0])]
			imgPlatList.append(imgPlat)
			cv.imshow("imgPlat" + str(index), imgPlat)

		#Step6: Find correct place by color.
		colorList = []
		for index, imgPlat in enumerate(imgPlatList):
			green = yellow = blue = 0
			imgHsv = cv.cvtColor(imgPlat, cv.COLOR_BGR2HSV)
			rows, cols = imgHsv.shape[:2]
			imgSize = cols * rows
			color = None

			for row in range(rows):
				for col in range(cols):
					H = imgHsv.item(row, col, 0)
					S = imgHsv.item(row, col, 1)
					V = imgHsv.item(row, col, 2)

					if 11 < H <= 34 and S > 34:
						yellow += 1
					elif 35 < H <= 99 and S > 34:
						green += 1
					elif 99 < H <= 124 and S > 34:
						blue += 1

			limit1 = limit2 = 0
			if yellow * 3 >= imgSize:
				color = "yellow"
				limit1 = 11
				limit2 = 34
			elif green * 3 >= imgSize:
				color = "green"
				limit1 = 35
				limit2 = 99
			elif blue * 3 >= imgSize:
				color = "blue"
				limit1 = 100
				limit2 = 124

			print("Image Index[", index, '], Color:', color)
			colorList.append(color)
			print(blue, green, yellow, imgSize)

			if color is None:
				continue

			# Step7: Resize vehicle img.
			left, right, top, bottom = self.accurate_place(imgHsv, limit1, limit2, color)
			w = right - left
			h = bottom - top

			if left == right or top == bottom:
				continue

			scale = w/h
			if scale < 2 or scale > 4:
				continue


			needAccurate = False
			if top >= bottom:
				top = 0
				bottom = rows
				needAccurate = True
			if left >= right:
				left = 0
				right = cols
				needAccurate = True
			# imgPlat[index] = imgPlat[top:bottom, left:right] \
			# if color != "green" or top < (bottom - top) // 4 \
			# else imgPlat[top - (bottom - top) // 4:bottom, left:right]
			imgPlatList[index] = imgPlat[top:bottom, left:right]
			cv.imshow("Vehicle Image " + str(index), imgPlatList[index])


if __name__ == '__main__':
	L = LPRAlg("3.jfif")
	L.findVehiclePlate()
	cv.waitKey(0)
下载1:OpenCV-Contrib扩展模块中文版教程
在「小白学视觉」公众号后台回复:扩展模块中文教程,即可下载全网第一份OpenCV扩展模块教程中文版,涵盖扩展模块安装、SFM算法、立体视觉、目标跟踪、生物视觉、超分辨率处理等二十多章内容。
下载2:Python视觉实战项目52讲
在「小白学视觉」公众号后台回复:Python视觉实战项目,即可下载包括图像分割、口罩检测、车道线检测、车辆计数、添加眼线、车牌识别、字符识别、情绪检测、文本内容提取、面部识别等31个视觉实战项目,助力快速学校计算机视觉。
下载3:OpenCV实战项目20讲
在「小白学视觉」公众号后台回复:OpenCV实战项目20讲,即可下载含有20个基于OpenCV实现20个实战项目,实现OpenCV学习进阶。
交流群
欢迎加入公众号读者群一起和同行交流,目前有SLAM、三维视觉、传感器、自动驾驶、计算摄影、检测、分割、识别、医学影像、GAN、算法竞赛等微信群(以后会逐渐细分),请扫描下面微信号加群,备注:”昵称+学校/公司+研究方向“,例如:”张三 + 上海交大 + 视觉SLAM“。请按照格式备注,否则不予通过。添加成功后会根据研究方向邀请进入相关微信群。请勿在群内发送广告,否则会请出群,谢谢理解~


