VMware虚拟机 ubuntu20.04编译rockpi4b 安卓11系统
时间:2023-01-15 22:00:00
VMware虚拟机 ubuntu20.04编译rockpi4b 安卓11系统
- 虚拟机信息
-
- 下载ubuntu20.04镜像
- VMware虚拟机配置信息
-
- 谷歌要求(原文见参考文件)
-
- 硬件要求
- 我的配置如下
- 更换阿里源
- 安装和配置
-
- 依赖库安装
- 下载repo工具
- 环境变量设置
- 下载安卓11源码
- 编译
-
- 1.整体编译
-
- 配置
- 编译
-
- 缺少gawk
- 缺少openssl
- 2.单元编译
-
- 编译uboot
- 编译内核
- 编译AOSP(安卓11)
- 总结
- 参考文档
虚拟机信息
下载ubuntu20.04镜像
点击我直接下载
以下配置均为20.04版本,如果需要其他版本的配置,请参考文档1-7,谷歌文档可能需要梯子才能访问
VMware虚拟机配置信息
谷歌要求(原文见参考文件)
硬件要求
您的开发工作站必须满足或超过以下硬件要求:
如果是 Android 2.3.x (Gingerbread) 还有更高的版本(包括 master 需要分支 64
位环境。如果是较低版本,可以在 32 位系统中进行编译。 至少需要检测代码 250 GB 可用磁盘空间;如果要构建,还需要
150 GB。若要多次构建,则需要更多的空间。 注:如果你想检测镜像,你需要更多的空间,因为它是完整的 Android 开源项目
(AOSP) 镜像包含所有使用过的镜像。 Git 代码库。 至少需要 16 GB 的可用 RAM,但 Google 建议提供 64 GB。 从
2021 年 6 月起,Google 使用 72 核机,内置 RAM 为 64 GB,大约需要完整的施工过程 40
分钟(增量构建只需几分钟,取决于修改了哪些文件)。相比之下,RAM 数量相近的 6 完整的核机施工过程需要完整的施工过程 3 个小时。
我的配置如下
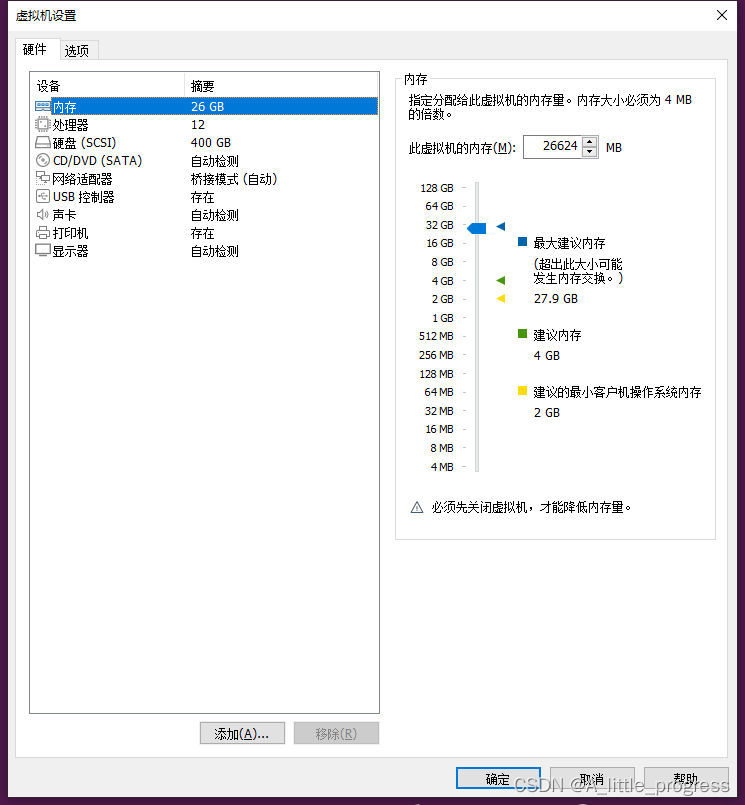
需要注意的是,虚拟机内存必须大于16G,否则会报很多莫名其妙的错误,折腾了一个星期都没解决,以后再解决。 直接使用钞票能力,加两个16G内存条。
建议硬盘大于500G,由于计算机资源有限,小编最大的分区是400G,最后,编译完成了270G左右
更换阿里源
deb http://mirrors.aliyun.com/ubuntu/ focal main restricted universe multiverse deb-src http://mirrors.aliyun.com/ubuntu/ focal main restricted universe multiverse deb http://mirrors.aliyun.com/ubuntu/ focal-security main restricted universe multiverse deb-src http://mirrors.aliyun.com/ubuntu/ focal-security main restricted universe multiverse deb http://mirrors.aliyun.com/ubuntu/ focal-updates main restricted universe multiverse deb-src http://mirrors.aliyun.com/ubuntu/ focal-updates main restricted universe multiverse # deb http://mirrors.aliyun.com/ubuntu/ focal-proposed main restricted universe multiverse # deb-src http://mirrors.aliyun.com/ubuntu/ focal-proposed main restricted universe multiverse deb http://mirrors.aliyun.com/ubuntu/ focal-backports main restricted universe multiverse deb-src http://mirrors.aliyun.com/ubuntu/ focal-backports main restricted universe multiverse 安装和配置
依赖库安装
sudo apt update sudo apt-get install git-core gnupg flex bison build-essential zip curl zlib1g-dev gcc-multilib g -multilib libc6-dev-i386 libncurses5 lib32ncurses5-dev x11proto-core-dev libx11-dev lib32z1-dev libgl1-mesa-dev libxml2-utils xsltproc unzip fontconfig gawk libssl-dev sudo ln -s /usr/bin/python3 /usr/bin/python 下载repo工具
curl https://mirrors.tuna.tsinghua.edu.cn/git/git-repo -o /tmp/repo -k sudo cp /tmp/repo /usr/local/bin/repo sudo chmod x /usr/local/bin/repo repo只支持python3.5以上版本需要升级python才能正常使用
谷歌 警告:对 Python 2 的支持已于 2020 年 1 月 1 日停,详情请见 Sunsetting Python 2(废弃Python 2)一篇文章。所有主要的 Linux 发行版正在停止支持 Python 2 软件包。Google 强建议您将所有脚本改用Python 3。
环境变量设置
在.bashrc末尾追加以下信息,然后关掉当前终端,重新打开一个,使环境变量生效
export REPO_URL='https://mirrors.tuna.tsinghua.edu.cn/git/git-repo/'
下载安卓11源码
如果没有设置git邮箱和名字的需要先设置一下
git config --global user.email "xxxx@qq.com" #设置邮箱
git config --global user.name "xxxx"         #设置名字
初始化repo
mkdir rock-android11
cd rock-android11

repo init -u https://gitee.com/a_little_progress/manifests.git -b Android11_Radxa_rk11 -m rockchip-r-release.xml
然后会看到如下打印,输入Y和N都可以,我选的n
Your identity is: xxx <xxxx@qq.com>
If you want to change this, please re-run 'repo init' with --config-name

Testing colorized output (for 'repo diff', 'repo status'):
  black    red      green    yellow   blue     magenta   cyan     white
  bold     dim      ul       reverse
Enable color display in this user account (y/N)?
然后开始同步源码
repo sync -d --no-tags -j12
有如下类似的报错信息,not a valid SHA1
Fetching: 60% (476/785) rk/hardware/rk29/mpi-mmzerror.GitError: Cannot fetch kernel/configs update-ref: fatal: 92eb6e4985f89504ea472eaec0be7c99c8d2cd4e^0: not a valid SHA1

Fetching: 98% (777/785) platform/prebuilts/sdkerror.GitError: Cannot fetch rk/kernel update-ref: fatal: 66abf06fb1af001ddf8ae75640bc80f43adcf331^0: not a valid SHA1
原因是官方更新了代码,但是没有更新repo的manifests文件,所以报错。
只需要修改,.repo/manifests/Android11_Radxa_rk11.2_customization.xml文件中的revision与https://gitlab.com/rockchip_android_r中的commit SHA一致即可,
注意要选对分支,选Android11_Radxa_rk11分支,默认是安卓10的分支,需要手动切换,再复制SHA到manifests文件
修改完之后重新同步,如果还出现这个情况就一直循环修改,直到全部同步完为止
#我这边只需要改掉上面两个commit SHA就可以正常同步了
repo sync -d --no-tags -j12

Fetching: 77% (606/785) platform/prebuilts/gcc/darwin-x86/aarch64/aarch64-linux-
Fetching: 77% (607/785) platform/prebuilts/gcc/darwin-x86/arm/arm-linux-androide
Fetching: 77% (608/785) platform/prebuilts/gcc/darwin-x86/host/i686-apple-darwin
Fetching: 78% (613/785) platform/prebuilts/gcc/linux-x86/mips/mips64el-linux-and
Fetching: 78% (614/785) platform/prebuilts/gcc/linux-x86/x86/x86_64-linux-androi
Fetching: 78% (617/785) platform/prebuilts/gcc/darwin-x86/mips/mips64el-linux-an
Fetching: 78% (618/785) platform/prebuilts/gcc/darwin-x86/x86/x86_64-linux-andro
Fetching: 78% (619/785) platform/prebuilts/gcc/linux-x86/aarch64/aarch64-linux-a
Fetching: 78% (620/785) rk/prebuilts/gcc-linaro-6.3.1-2017.05-x86_64_aarch64-lin
Fetching: 100% (785/785), done in 45m51.043s
Garbage collecting: 100% (785/785), done in 4.090s
Updating files: 100% (539/539), done.
Updating files: 100% (558/558), done.
Updating files: 100% (602/602), done.
Updating files: 100% (497/497), done.
Updating files: 100% (1647/1647), done.
Updating files: 100% (273/273), done.
Updating files: 100% (64/64), done.

........省略N个Updating files打印..........
Checking out: 100% (785/785), done in 45m48.548s
repo sync has finished successfully.
到这里源码就成功下载好了。
编译
整体编译和单元编译二选一。
1.整体编译
配置
source build/envsetup.sh
lunch rk3399_ROCKPI4B_Android11-userdebug
配置完有如下打印
device/rockchip/common/device.mk:931: warning: Please set client id with your own MADA ID!

============================================
PLATFORM_VERSION_CODENAME=REL
PLATFORM_VERSION=11
TARGET_PRODUCT=rk3399_ROCKPI4B_Android11
TARGET_BUILD_VARIANT=userdebug
TARGET_BUILD_TYPE=release
TARGET_ARCH=arm64
TARGET_ARCH_VARIANT=armv8-a
TARGET_CPU_VARIANT=cortex-a53
TARGET_2ND_ARCH=arm
TARGET_2ND_ARCH_VARIANT=armv7-a-neon
TARGET_2ND_CPU_VARIANT=cortex-a15
HOST_ARCH=x86_64
HOST_2ND_ARCH=x86
HOST_OS=linux
HOST_OS_EXTRA=Linux-5.13.0-51-generic-x86_64-Ubuntu-20.04.4-LTS
HOST_CROSS_OS=windows
HOST_CROSS_ARCH=x86
HOST_CROSS_2ND_ARCH=x86_64
HOST_BUILD_TYPE=release
BUILD_ID=RQ3A.210705.001
OUT_DIR=out
============================================
编译
帮助文档
./build.sh --help
device/rockchip/common/device.mk:931: warning: Please set client id with your own MADA ID!
./build.sh: illegal option -- -
USAGE: [-U] [-CK] [-A] [-p] [-o] [-u] [-v VERSION_NAME]
No ARGS means use default build option
WHERE: -U = build uboot
       -C = build kernel with Clang
       -K = build kernel
       -A = build android
       -p = will build packaging in IMAGE
       -o = build OTA package
       -u = build update.img
       -v = build android with 'user' or 'userdebug'
       -d = huild kernel dts name
       -V = build version
       -J = build jobs
开始编译
./build.sh -J12 -UACKup #我最大支持12线程编译
然后就 开始漫长的编译 阶段了。下面列出可能会遇到的问题
缺少gawk
awk: line 2: function strtonum never defined
Build uboot failed!
执行命令安装即可
sudo apt-get install gawk
缺少openssl
scripts/extract-cert.c:21:10: fatal error: openssl/bio.h: No such file or directory
21 | #include
| ^~~~~~~~~~~~~~~
执行命令安装即可
sudo apt-get install libssl-dev
2.单元编译
编译uboot
cd u-boot
#清除编译信息
make clean
make mrproper
make distclean

#配置和编译
./make.sh rockpi4b
编译内核
cd kernel

#配置
ADDON_ARGS="CC=../prebuilts/clang/host/linux-x86/clang-r383902b/bin/clang LD=../prebuilts/clang/host/linux-x86/clang-r383902b/bin/ld.lld"

#清除
make clean

#编译
make $ADDON_ARGS ARCH=arm64 rockchip_defconfig android-11.config rockpi_4b.config
make $ADDON_ARGS ARCH=arm64 rk3399-rockpi-4b.img -j12
编译AOSP(安卓11)
#配置
source buile/envsetup.sh
lunch rk3399_ROCKPI4B_Android11-userdebug

#编译
make -j12
这一块比较耗时,我大概耗费了四个多小时。
#### build completed successfully (04:18:29 (hh:mm:ss)) ####
Build android ok!
总结
经过几天的折腾终于编译成功了,浪费这么多时间的最大原因是内存低于16G,导致会出现很多莫名其妙的错误,当我主机内存加到32G时,之前遇到的问题都没了。其次就是rockpi提供的文档过于少,而谷歌官方文档又需要梯子(不得不使用钞能力)。源码过于庞大,编译环境没搞好就很耽误时间。以我这个配置为例,一路顺畅的话,下载加编译也需要8个小时以上才能编译完。
rockpi不建议小白入手!
参考文档
参考文档1
参考文档2
参考文档3
参考文档4
参考文档5
参考文档6
参考文档7
参考文档8


