Nginx(1)基础部分
时间:2022-12-15 07:30:01
Nginx基础概述
nginx简述
Nginx它是开源、高性能、可靠的Http Web服务,代理服务。
开源: 直接获取源代码
高性能: 支持海量并发
可靠: 服务稳定
为什么要选择?Nginx服务
Nginx非常轻量
功能模块少(源代码只保留)http与核心模块代码,其余不够核心代码会作为插件来安装)
代码模块化 (易读,易于二次开发,对开发人员非常友好)
所有互联网公司Nginx
1.Nginx技术成熟,具有企业最常用、最需要的功能
2.适合当前主流架构趋势, 微服务、云架构、中间层
三、统一技术栈, 降低维护成本*,* 降低技术更新成本。
Nginx采用Epool网络模型,Apache采用Select模型
Select: 当用户发起请求时,select模型扫描一次遍历,导致性能低下。
Epool: 当用户发起请求时,epool模型会直接进行处理,效率高效,并无连接限制。
处理大量连接读写,Apache所采用的select网络I/O模型非常低效。用比喻解释Apache采用的select模型和Nginx采用的epoll模型之间的区别:
假设你在大学学习,宿舍楼有很多房间,你的朋友会来找你。select版宿管阿姨会带你的朋友一个个去找房间,直到找到你。而epoll宿舍管理阿姨会先写下每个学生的房间号码。当你的朋友来的时候,你只需要告诉你的朋友你住在哪个房间,而不是带你的朋友去大楼找人。如果来了10000个人,都要找自己住这栋楼的同学时,select版和epoll版宿管阿姨,谁效率更高,不言而喻。同样,在高并发服务器中,轮询I/O是最耗时的操作之一 一,select和epoll谁的性能更高,也很清楚。
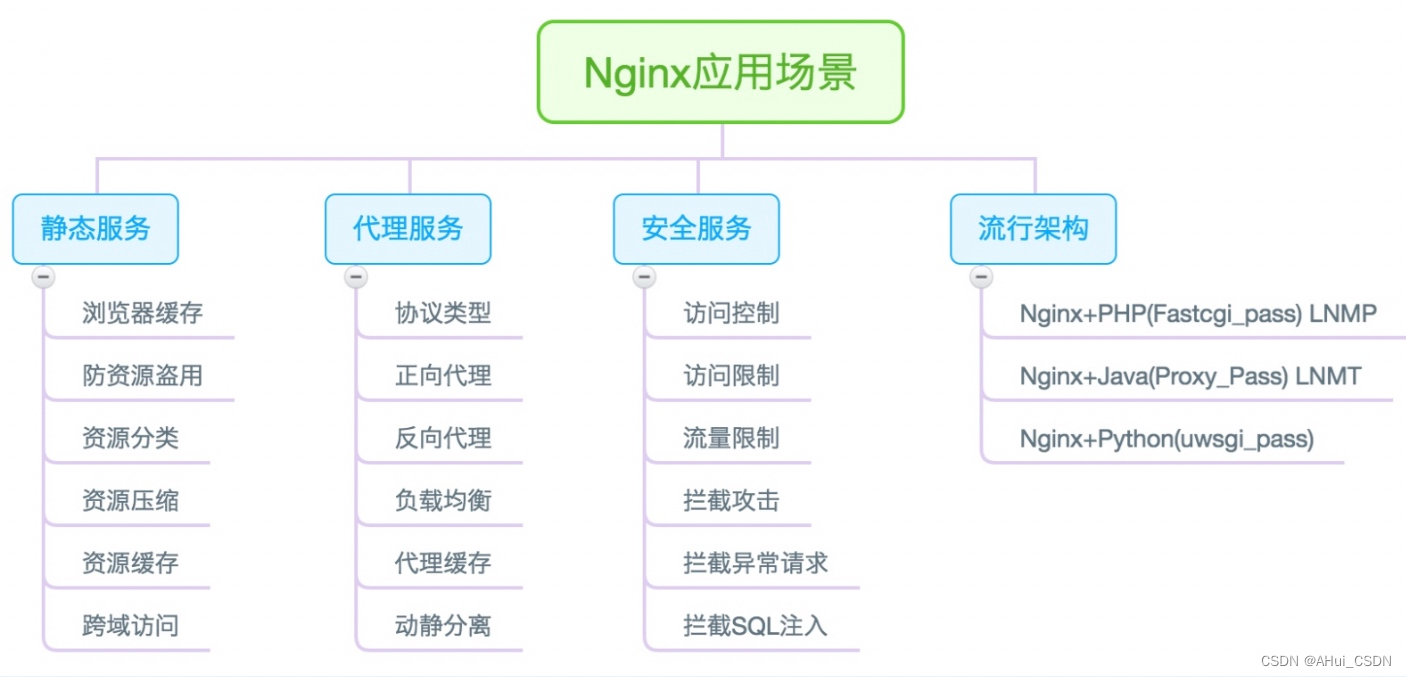
Nginx典型的应用场景
Nginx和Apache区别
Nginx
轻量级,采用 C 写作,同样 web 服务将占用更少的内存和资源
抗并发,nginx 以 epoll and kqueue 作为一种开发模型,处理要求是异步非阻塞,负载能力比 apache 高很多,而 apache 是阻塞型。在高并发下 nginx 保持低资源低消耗高性能 ,而 apache 在 PHP 在处理缓慢或前端压力大的情况下,进程数量容易飙升,从而拒绝服务。
nginx 静态文件处理良好,静态处理性能比 apache 高三倍以上
nginx 设计高度模块化,编写模块相对简单
nginx 配置简单,正则配置让很多事情变得简单,改变配置可以使用 -t 测试配置是否有问题,apache 配置复杂 ,重启时发现配置错误,会崩溃
nginx 支持作为负载服务器 7 层负载均衡
nginx 它本身就是一个反向代理服务器,可以作为一个非常好的邮件代理服务器
启动特别容易, 而且几乎可以做到 7*24 连续运行,即使运行几个月也不需要重新启动,软件版本也可以不间断升级。
社区活跃,各种高性能模块生产迅速
Apache
apache 的 rewrite 比 nginx 强大,在 rewrite 经常使用 apache
apache 到目前为止,有很多模块,基本上可以找到你想到的
apache 更成熟,更少 bug ,nginx 的 bug 相对较多
apache 超稳定
apache 对 PHP 支持相对简单,nginx 需要与其他后端配合使用
apache 处理动态请求有优势,nginx 这方面是鸡肋,一般动态要求 apache 去做,nginx 适用于静态和反向。
常用的服务器软件
静态WEB软件:
???nginx
???apache
???IIS
???lighttpd
???tengine
???openresty-nginx
动态WEB软件:
???Tomcat
???Resin
???weblogic
???Jboss
Nginx的安装方式
1.源码编译=>Nginx (1.版本随意 2.安装复杂 3.升级繁琐 4.规范 5.自由选择功能 6.选择安装位置 7.管理方便)
2.epel仓库=>Nginx (1.版本较低 2.安装简单 3.配置不易读)
3.官方仓库=>Nginx (1)版本更新稳定版 2.安装简单 3.配置易读)
通过官网YUM安装仓库
配置Nginx仓库 找到nginx官网仓库配置文件
https://nginx.org/en/linux_packages.html#RHEL-CentOS
配置官方yum源
[root@web01 ~]# vim /etc/yum.repos.d/nginx.repo [nginx-stable] # 名称 name=nginx stable repo # 名称 baseurl=http://nginx.org/packages/centos/$releasever/$basearch/ # 仓库的URL gpgcheck=1 # MD5校验 enabled=1 # 1为开启仓库 0为关闭仓库 gpgkey=https://nginx.org/keys/nginx_signing.key # MD5指纹 安装Nginx
[root@web01 ~]# yum -y install nginx 启动Nginx加入启动自动运行
[root@web01 ~]# systemctl start nginx [root@web01 ~]# systemctl enable nginx
检查端口和进程 Nginx默认端口80
[root@web01 ~]# netstat -ntulp
Active Internet connections (only servers)
Proto Recv-Q Send-Q Local Address           Foreign Address         State       PID/Program name
tcp        0      0 0.0.0.0:80              0.0.0.0:*               LISTEN      22138/nginx: master
查看进程:
[root@web01 ~]# ps axu|grep nginx
root      22138  0.0  0.0  49012  1004 ?        Ss   09:36   0:00 nginx: master process /usr/sbin/nginx -c /etc/nginx/nginx.conf
查看Nginx版本号:
[root@web01 ~]# nginx -v
nginx version: nginx/1.22.0
查看Nignx的编译参数:
[root@web01 ~]# nginx -V
nginx version: nginx/1.16.0
built by gcc 4.8.5 20150623 (Red Hat 4.8.5-36) (GCC)
built with OpenSSL 1.0.2k-fips  26 Jan 2017
TLS SNI support enabled
configure arguments: --prefix=/etc/nginx --sbin-path=/usr/sbin/nginx --modules-path=/usr/lib64/nginx/modules --conf-path=/etc/nginx/nginx.conf --error-log-path=/var/log/nginx/error.log --http-log-path=/var/log/nginx/access.log --pid-path=/var/run/nginx.pid --lock-path=/var/run/nginx.lock --http-client-body-temp-path=/var/cache/nginx/client_temp --http-proxy-temp-path=/var/cache/nginx/proxy_temp --http-fastcgi-temp-path=/var/cache/nginx/fastcgi_temp --http-uwsgi-temp-path=/var/cache/nginx/uwsgi_temp --http-scgi-temp-path=/var/cache/nginx/scgi_temp --user=nginx --group=nginx --with-compat --with-file-aio --with-threads --with-http_addition_module --with-http_auth_request_module --with-http_dav_module --with-http_flv_module --with-http_gunzip_module --with-http_gzip_static_module --with-http_mp4_module --with-http_random_index_module --with-http_realip_module --with-http_secure_link_module --with-http_slice_module --with-http_ssl_module --with-http_stub_status_module --with-http_sub_module --with-http_v2_module --with-mail --with-mail_ssl_module --with-stream --with-stream_realip_module --with-stream_ssl_module --with-stream_ssl_preread_module --with-cc-opt='-O2 -g -pipe -Wall -Wp,-D_FORTIFY_SOURCE=2 -fexceptions -fstack-protector-strong --param=ssp-buffer-size=4 -grecord-gcc-switches -m64 -mtune=generic -fPIC' --with-ld-opt='-Wl,-z,relro -Wl,-z,now -pie'
浏览器访问10.0.0.7
访问的是Nginx默认页面
Nginx服务动作:
通过systemctl来管理Nginx服务
[root@web01 ~]#systemctl start nginx # 启动Nginx服务
[root@web01 ~]#systemctl stop nginx # 停止Nginx服务
[root@web01 ~]#systemctl restart ngixn # 重启Nginx服务
[root@web01 ~]#systemctl reload nginx # 重新加载nginx服务配置
[root@web01 ~]#systemctl status nginx # 查看Nginx服务状态
[root@web01 ~]#systemctl enable nginx # 开机自动启动
不使用systemctl管理nginx服务 使用nginx的命令直接运行服务
[root@web01 ~]# /usr/sbin/nginx # 启动Nginx服务
[root@web01 ~]# /usr/sbin/nginx -s stop # 停止Nginx服务
[root@web01 ~]# /usr/sbin/nginx -s reload # 重新加载Nginx服务
报错:
[root@web01 ~]# /usr/sbin/nginx -s reload
nginx: [error] open() "/var/run/nginx.pid" failed (2: No such file or directory)
nginx: 错误 打开 /var/run/nginx.pid 失败 找不到这个文件
当服务运行后都会产生PID号
nginx产生的PID号会记录到/var/run/nginx.pid 文件中
强制杀死Nginx进程:
先过滤进程ID
[root@web01 ~]# ps axu|grep nginx
root      22229  0.0  0.0  49012  1000 ?        Ss   09:53   0:00 nginx: master process /usr/sbin/nginx -c etc/nginx/nginx.conf
nginx     22230  0.0  0.1  49416  1972 ?        S    09:53   0:00 nginx: worker process
root      22238  0.0  0.0 112704   960 pts/1    R+   09:54   0:00 grep --color=auto nginx
使用kill命令强制杀死
[root@web01 ~]# kill -9 22229
[root@web01 nginx]# /usr/sbin/nginx
nginx: [emerg] bind() to 0.0.0.0:80 failed (98: Address already in use) # 端口被占用 或者 服务已经启动
Nginx相关文件介绍
为了让大家更清晰的了解Nginx软件的全貌,可使用rpm -ql nginx查看整体的目录结构及对应的功能,如下表格整理了Nginx比较重要的配置文件
1.Nginx主配置文件
| 路径 | 类型 | 作用 |
|---|---|---|
| /etc/nginx/nginx.conf | 配置文件 | nginx主配置文件 |
| /etc/nginx/conf.d/default.conf | 配置文件 | 默认网站配置文件 |
2.Nginx代理相关参数文件
| 路径 | 类型 | 作用 |
|---|---|---|
| /etc/nginx/fastcgi_params | 配置文件 | Fastcgi代理配置文件 |
| /etc/nginx/scgi_params | 配置文件 | scgi代理配置文件 |
| /etc/nginx/uwsgi_params | 配置文件 | uwsgi代理配置文件 |
3.Nginx编码相关配置文件
| 路径 | 类型 | 作用 |
|---|---|---|
| etc/nginx/win-utf | 配置文件 | Nginx编码转换映射文件 |
| /etc/nginx/koi-utf | 配置文件 | Nginx编码转换映射文件 |
| /etc/nginx/koi-win | 配置文件 | Nginx编码转换映射文件 |
| /etc/nginx/mime.types | 配置文件 | Content-Type与扩展名 |
4.Nginx管理相关命令
| 路径 | 类型 | 作用 |
|---|---|---|
| /usr/sbin/nginx | 命令 | Nginx命令行管理终端工具 |
| /usr/sbin/nginx-debug | 命令 | Nginx命令行与终端调试工具 |
5.Nginx日志相关目录与文件
| 路径 | 类型 | 作用 |
|---|---|---|
| /var/log/nginx | 目录 | Nginx默认存放日志目录 |
| /etc/logrotate.d/nginx | 配置文件 | Nginx默认的日志切割 |
Nginx默认配置文件
Nginx主配置文件/etc/nginx/nginx.conf是一个纯文本类型的文件,整个配置文件是以区块的形式组织的。一般,每个区块以一对大括号{}来表示开始与结束。
主配置文件
nginx主配置文件是用来连接客户端和响应客户端的参数
[root@web01 nginx]# cat nginx.conf

----------------------------------------核心区块
user  nginx;					# 启动Nginx使用的用户 安装nginx自动创建nginx虚拟用户 不需要自己创建
worker_processes  auto;		    # 进程数量 自动的和CPU核心数量一致

error_log  /var/log/nginx/error.log notice;  # 错误日志的位置
pid        /var/run/nginx.pid;				 # 存放PID的文件位置

-----------------------------------------事件模块

events {

    worker_connections  25535;				 # 每个进程最大的连接数
	use epoll;      						 # Nginx默认使用的epoll模型 可以不写
}
-----------------------------------------http区块主要响应客户端连接

http {

    include       /etc/nginx/mime.types;	  # 媒体类型.mp4 .avi .txt .doc
    default_type  application/octet-stream;   # 如果没有支持的类型 默认为下载

	#日志格式
    log_format  main  '$remote_addr - $remote_user [$time_local] "$request" '
                      '$status $body_bytes_sent "$http_referer" '
                      '"$http_user_agent" "$http_x_forwarded_for"';

    access_log  /var/log/nginx/access.log  main; # 调用main变量格式

    sendfile        on;						    # 高效传输
    #tcp_nopush on;

    keepalive_timeout  65;						# 长连接超时时间

    #gzip on; # 是否压缩

    include /etc/nginx/conf.d/*.conf;			# 将conf.d目录下所有的*.conf 包含到nginx.conf主配置文件
}
include说明:
vim /etc/nginx/nginx.conf
http {

log main  日志格式
send_file 高效传输
......
......
	server {

		listen 80
		server_name www.linuxnc.com
		cat test.txt # test.txt绝对路径是/etc/nginx/test.txt
	}

}
--------------------------------上面写法和下面的写法相同--------------------------------
下面的写法通过包含关系将配置文件分开 更易读
vim /etc/nginx/nginx.conf
http {

log main  日志格式
send_file 高效传输
......
......
include /etc/nginx/conf.d/*.conf
}


vim /etc/nginx/conf.d/www.conf
server {

	listen 80
	server_name www.linuxnc.com
	cat test.txt # test.txt绝对路径是: /etc/nginx/test.txt
}
nginx的server配置文件
nginx的server区块用来给用户返回真实数据的配置文件
用户访问的什么 server区块就需要返回什么内容
[root@web01 conf.d]# cat default.conf
server {

	listen 80;		 			  # 监听的端口 服务默认运行在哪个端口 类似SSH的22端口
	server_name www.oldboy.com;   # 网站域名 如果写域名需要做hosts解析 空的直接使用IP地址来访问
								  # 配置为域名也可以用IP地址来访问

	location / {
        				  # 匹配访问的路径
	root /code/;				  # 用户访问网站数据 默认在/code目录下找
	index index.html index.htm;   # 默认给用户返回Index.html 或者返回index.htm
	}

}
http server location扩展了解项
http{}层下允许有多个**Server{}层,一个Server{}层下又允许有多个**Location
http{} 标签主要用来解决用户的请求与响应。
server{} 标签主要用来响应具体的某一个网站。
location{} 标签主要用于匹配网站具体URL路径。
日志格式
[root@web01 ~]#tail /var/log/nginx/access.log
10.0.0.1 - - [15/Jun/2022:12:25:13 +0800] "GET /favicon.ico HTTP/1.1" 404 555 "http://www.b13king.com/" "Mozilla/5.0 (Windows NT 10.0; Win64; x64) AppleWebKit/537.36 (KHTML, like Gecko) Chrome/102.0.5005.63 Safari/537.36 Edg/102.0.1245.39" "-"
$remote_addr # 来源公网IP地址 谁访问的我
$remote_user # 远程登陆用户
[$time_local] # 本地时间
$request # 请求的链接URL
$status # 状态码
$body_bytes_sent # 服务端给客户端返回数据的大小
$http_referer # 从哪个网站链接过来的 直接访问是没有的
$http_user_agent # 客户端信息 操作系统 版本浏览器信息
$http_x_forwarded_for # 如果前端有代理则记录真实的客户端IP地址
通过Nginx -t检测文件是否正确
[root@web01 conf.d]# nginx -t
nginx: the configuration file /etc/nginx/nginx.conf syntax is ok
nginx: configuration file /etc/nginx/nginx.conf test is successful
查看当前和服务器建立的连接数
[root@web01 nginx]# netstat -an|grep ES
tcp        0     52 10.0.0.7:22             10.0.0.1:57777          ESTABLISHED
tcp        0      0 10.0.0.7:80             10.0.0.1:61033          ESTABLISHED
Nginx网站配置
1.新增nginx配置文件
[root@web01 conf.d]# cat /etc/nginx/conf.d/game.conf
server {

    listen 80;
    server_name game.ahui.com;

    location / {

        root /code;
        index index.html;
    }
}
2.放置游戏源代码文件至nginx配置文件root指定的目录
[root@web01 conf.d]# mkdir /code && cd /code
[root@web01 code]# rz html5.zip
[root@web01 code]# unzip html5.zip
[root@web01 code]# ls
ceshi  game  html5.zip  img  index.html  readme.txt
3.检查nginx的语法是否存在错误
[root@web01 code]# nginx -t
nginx: the configuration file /etc/nginx/nginx.conf syntax is ok
nginx: configuration file /etc/nginx/nginx.conf test is successful
4.重载Nginx [reload|restart]
[root@web01 code]# systemctl reload nginx
5.设置hosts
10.0.0.7 game.ahui.com
6.检测是否设置成功
[c:\~]$ ahui$ ping game.ahui.com
PING game.ahui.com (10.0.0.7): 56 data bytes
64 bytes from 10.0.0.7: icmp_seq=0 ttl=64 time=0.267 ms
64 bytes from 10.0.0.7: icmp_seq=1 ttl=64 time=0.450 ms
64 bytes from 10.0.0.7: icmp_seq=2 ttl=64 time=0.508 ms
64 bytes from 10.0.0.7: icmp_seq=3 ttl=64 time=0.464 ms
7.浏览器检测
打开浏览器访问:http://game.ahui.com
Nginx配置方式
多域名方式配置
不同的域名对应不同的业务:
game1.ahui.com -----> 玛丽
game2.ahui.com -----> xiaoniao
game3.ahui.com -----> 不能死
[root@web01 conf.d]# cat *.conf
server {

	listen 80;
	server_name game1.ahui.com;

	location / {

	root /code/mali/;
	index index.html Index.htm;
	}

}
server {

	listen 80;
	server_name game2.ahui.com;

	location / {

	root /code/38612/;
	index index.html Index.htm;
	}

}
server {

	listen 80;
	server_name game3.ahui.com;

	location / {

	root /code/xq/;
	index index.html Index.htm;
	}

}
域名对应的代码目录
[root@web01 ~]# ll /code/
total 4
drwxr-xr-x 4 root root  110 Jun 15 12:17 38612
drwxr-xr-x 4 root root  150 Jun 16 09:50 mali
drwxr-xr-x 5 root root 4096 Jun 16 09:52 xq
测试并重启nginx:
[root@web01 conf.d]# nginx -t
nginx: the configuration file /etc/nginx/nginx.conf syntax is ok
nginx: configuration file /etc/nginx/nginx.conf test is successful
[root@web01 conf.d]# systemctl restart nginx
上面配置方式通过多主机的方式进行配置实际用了一个域名 只申请一个域名
服务器: 116.63.0.10
ahui.com # 我购买的域名
www.ahui.com —> 玛丽 DNS域名解析后台配置DNS解析: www.ahui.com —> 116.63.0.10
xiaoniao.ahui.com ----> 小鸟 xiaoniao.ahui.com --> 116.63.0.10
bns.ahui.com ----> 不能死 bns.ahui.com ----> 116.63.0.10
使用多域名方式进行配置: 域名不能相同 必须申请三个域名
www.mali.com
www.xiaoniao.com
www.bns.com
注意: 可以在一个.conf中写多个server区块
[root@web01 conf.d]# cat test.conf
server {

	listen 80;
	server_name www.mali.com;

	location / {

	root /code/mali/;
	index index.html index.htm;
	}
}
server {

        listen 80;
        server_name www.xiaon.com;

        location / {

        root /code/xq/;
        index index.html index.htm;
        }
}
server {

        listen 80;
        server_name www.bns.com;

        location / {

        root /code/38612/;
        index index.html index.htm;
        }
}
单网卡多个IP地址配置方式
配置网卡多IP:
[root@web01 ~]# ip addr add 10.0.0.8/24 dev eth0
[root@web01 ~]# ip addr add 10.0.0.9/24 dev eth0
第一个业务监听在10.0.0.7IP地址
[root@web01 conf.d]# cat xiaoniao.conf
server {

	listen 10.0.0.7:80;
	server_name _;

	location / {

	root /code/38612/;
	index index.html Index.htm;
	}

}
第二个业务监听在10.0.0.8 IP地址
[root@web01 conf.d]# cat mali.conf
server {

	listen 10.0.0.8:80;
	server_name _;

	location / {

	root /code/mali/;
	index index.html Index.htm;
	}

}
第三个业务监听在10.0.0.9 IP地址
[root@web01 conf.d]# cat xq.conf
server {

	listen 10.0.0.9:80;
	server_name _;

	location / {

	root /code/xq/;
	index index.html Index.htm;
	}
}
配置完成后需要重启Nginx 新增加的配置文件需要重启Nginx 如果不加新文件只修改可以使用reload
[root@web01 conf.d]# systemcl restart nginx
Nginx多端口配置方式
在内部服务器中 或者后台管理页面都使用不同端口
80对应玛丽业务
	[root@web01 conf.d]# cat mali.conf
	server {

		listen 80;
		server_name www.ahui.com;

		location / {

		root /code/mali/;
		index index.html Index.htm;
		}

	}
81端口对应 38业务
[root@web01 conf.d]# cat xiaoniao.conf
server {

	listen 81;
	server_name www.ahui.com;

	location / {

	root /code/38612/;
	index index.html Index.htm;
	}

}
82端口对应xq业务
[root@web01 conf.d]# cat
mali.conf      xiaoniao.conf  xq.conf
[root@web01 conf.d]# cat xq.conf
server {

	listen 82;
	server_name www.ahui.com;

	location / {

	root /code/xq/;
	index index.html Index.htm;
	}

}
检测并重启Nginx
[root@web01 conf.d]# nginx -t
nginx: the configuration file /etc/nginx/nginx.conf syntax is ok
nginx: configuration file /etc/nginx/nginx.conf test is successful
[root@web01 conf.d]# systemctl restart nginx
后台: 管理员登陆 用户不能登陆后台
www.b13king.com:8000 -------------> 商城订单管理
www.b13king.com:9000 -------------> 商城用户管理
Nginx日志管理
Nginx有非常灵活的日志记录模式,每个级别的配置可以有各自独立的访问日志。日志格式通过log_format命令定义格式。
log_format详解
在nginx默认的配置文件中,log_format已经将日志格式定死,但我们可以将其修改。
1.log_format的作用是定义日志格式语法
# 配置语法: 包括: error.log access.log
Syntax: log_format name [escape=default|json] string ...;
Default: log_format combined "...";
Context: http
2.nginx默认日志格式语法如下:
log_format  main  '$remote_addr - $remote_user [$time_local] "$request" '
                      '$status $body_bytes_sent "$http_referer" '
                      '"$http_user_agent" "$http_x_forwarded_for"';
3.Nginx日志格式允许包含的内置变量
$remote_addr        # 记录客户端IP地址
$remote_user        # 记录客户端用户名
$time_local         # 记录通用的本地时间
$time_iso8601       # 记录ISO8601标准格式下的本地时间
$request            # 记录请求的方法以及请求的http协议
$status             # 记录请求状态码(用于定位错误信息)
$body_bytes_sent    # 发送给客户端的资源字节数,不包括响应头的大小
$bytes_sent         # 发送给客户端的总字节数
$msec               # 日志写入时间。单位为秒,精度是毫秒。
$http_referer       # 记录从哪个页面链接访问过来的
$http_user_agent    # 记录客户端浏览器相关信息
$http_x_forwarded_for #记录客户端IP地址
$request_length     # 请求的长度(包括请求行, 请求头和请求正文)。
$request_time       # 请求花费的时间,单位为秒,精度毫秒
# 注:如果Nginx位于负载均衡器,nginx反向代理之后, web服务器无法直接获取到客 户端真实的IP地址。
# $remote_addr获取的是反向代理的IP地址。 反向代理服务器在转发请求的http头信息中,
# 增加X-Forwarded-For信息,用来记录客户端IP地址和客户端请求的服务器地址。
4.access_log日志配置语法
Syntax: access_log path [format [buffer=size] [gzip[=level]] [flush=time] [if=condition]];
access_log off;
Default: access_log logs/access.log combined;
Context: http, server, location, if in location, limit_except
5.Nginx Access日志配置实践
server {
    listen 80;
    server_name code.oldboy.com;

    #将当前的server网站的访问日志记录至对应的目录,使用main格式
    access_log /var/log/nginx/code.oldboy.com.log main;
    location / {
        root /code;
    }

    #当有人请求改favicon.ico时,不记录日志
    location /favicon.ico {
        access_log off;
        return 200;
    }
}
Nginx日志切割
为了防止日志丢失 或者 日志文件过大 将原有的日志文件移动成以时间命名的文件,然后服务重载生成新的日志文件
使用logrotate切割日志
Nginx日志系统默认的logrotate切割
[root@web01 ~]# cat /etc/logrotate.d/nginx
/var/log/nginx/*.log {

        daily                   # 每天切割日志
        missingok               # 日志丢失忽略
        rotate 52               # 日志保留52天
        compress                # 日志文件压缩
        delaycompress           # 延迟压缩日志
        notifempty              # 不切割空文件
        create 640 nginx adm    # 日志文件权限
        sharedscripts
        postrotate      # 切割日志执行的命令
                if [ -f /var/run/nginx.pid ]; then
                        kill -USR1 `cat /var/run/nginx.pid`
                fi
        endscript
}
日志切割后的效果
[root@web01 ~]# ll /var/log/nginx/
total 4044
-rw-r----- 1 www adm  54438 Oct 12 03:28 access.log-20181012.gz
-rw-r----- 1 www adm  28657 Oct 13 03:48 access.log-20181013.gz
-rw-r----- 1 www adm  10135 Oct 12 03:28 error.log-20181130.gz
-rw-r----- 1 www adm   7452 Oct 13 03:48 error.log-20181201.gz
goaccess 日志监控
第一步: 安装
[root@web01 ~]# yum -y install goaccess
第二步: 配置
[root@web01 ~]# vim /etc/goaccess/goaccess.conf
time-format %H:%M:%S
date-format %d/%b/%Y
\# NCSA Combined Log Format
log-format %h %^[%d:%t %^] "%r" %s %b "%R" "%u"
第三步: 通过命令行测试
[root@web01 ~]# goaccess -f /var/log/nginx/access.log
第四步: 希望把页面存储下来使用浏览器进行访问
vim go.oldboy.com
server {

        listen 80;
        server_name go.oldboy.com;

        location / {

        root /code/log;
        index index.html;
        }
}
{
        root@web01 ~]# mkdir /code/log
[root@web01 ~]# nohup goaccess -f /var/log/nginx/access.log -o /code/log/index.html -p /etc/goaccess/goaccess.conf --real-time-html &
定时任务
有的服务默认不进行切割 使用脚本+定时任务方式进行日志切割:
[root@web01 ~]# crontab -e
mv /var/log/nginx/access.log  /var/log/nginx/access_`date +%F`.log
效果展示
[root@web01 ~]# ll /var/log/nginx/
total 284
-rw-r----- 1 nginx adm 157903 Jun 16 10:50 access.log
-rw-r----- 1 nginx adm 130022 Jun 16 10:50 error.log
[root@web01 ~]# mv /var/log/nginx/access.log /var/log/nginx/access_`date +%F`.log
[root@web01 ~]# ll /var/log/nginx/
total 284
-rw-r----- 1 nginx adm 157903 Jun 16 10:50 access_2022-06-16.log

重新加载服务生成日志文件
[root@web01 ~]# systemctl reload nginx
[root@web01 ~]# ll /var/log/nginx/
total 284
-rw-r----- 1 nginx adm  157903 Jun 16 10:50 access_2022-06-16.log
-rw-r--r-- 1 root  root      0 Jun 16 11:27 access.log
-rw-r----- 1 nginx adm  130777 Jun 16 11:27 error.log


